导语:本站已经全面启用了HTTPS方式,叶子申请的是let’s encrypt的SSL证书,90天到时,可以自动续约,一条命令就可以了。现在把整个过程分享给大家。注意,这种方式只适合独立云主机。
下载certbot-auto
我们使用官方发布的工具包来申请和管理SSL证书,下载certbot-auto。
wget https://dl.eff.org/certbot-auto
给certbot-auto加上写和执行的权限
chmod a+x ./certbot-auto
执行certbot-auto
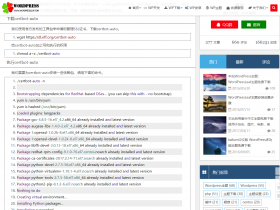
我们需要为certbot-auto安装一些依赖包,请用下面的命令。
./certbot-auto -n

Bootstrapping dependencies for RedHat-based OSes... (you can skip this with --no-bootstrap)
yum is /usr/bin/yum
yum is hashed (/usr/bin/yum)
Loaded plugins: langpacks
Package gcc-4.8.5-16.el7_4.2.x86_64 already installed and latest version
Package augeas-libs-1.4.0-2.el7_4.2.x86_64 already installed and latest version
Package 1:openssl-1.0.2k-8.el7.x86_64 already installed and latest version
Package 1:openssl-devel-1.0.2k-8.el7.x86_64 already installed and latest version
Package libffi-devel-3.0.13-18.el7.x86_64 already installed and latest version
Package redhat-rpm-config-9.1.0-76.el7.centos.noarch already installed and latest version
Package ca-certificates-2017.2.14-71.el7.noarch already installed and latest version
Package python-devel-2.7.5-58.el7.x86_64 already installed and latest version
Package python-virtualenv-1.10.1-4.el7.noarch already installed and latest version
Package python-tools-2.7.5-58.el7.x86_64 already installed and latest version
Package python2-pip-8.1.2-6.el7.noarch already installed and latest version
Nothing to do
Creating virtual environment...
Installing Python packages...
Installation succeeded.
Saving debug log to /var/log/letsencrypt/letsencrypt.log
Missing command line flags. For non-interactive execution, you will need to specify a plugin on the command line.  Run with '--help plugins' to see a list of options, and see https://eff.org/letsencrypt-plugins for more detail on what the plugins do and how to use them.
如果不加-n参数,叶子在Installing Python packages的时候遇到了一个错误。
urllib2.HTTPError: HTTP Error 503: Backend is unhealthy
这个错误老是跳不过去,后来加上-n的参数就执行成功了。
如果你想知道-n参数有什么意思,可以执行下面的命令。
./certbot-auto --help
申请SSL证书
如果你使用–help参数看了certbot-auto的使用方式,那么就明白下面申请SSL证书的命令是什么意思了。
./certbot-auto certonly --email 你的邮箱@email.com --agree-tos --webroot -w 网站根目录 -d www.wordpressleaf.com

Saving debug log to /var/log/letsencrypt/letsencrypt.log
Plugins selected: Authenticator webroot, Installer None
Obtaining a new certificate
Performing the following challenges:
http-01 challenge for www.wordpressleaf.com
Using the webroot path /opt/lampp/htdocs/wordpresssummer for all unmatched domains.
Waiting for verification...
Cleaning up challenges

IMPORTANT NOTES:
 - Congratulations! Your certificate and chain have been saved at:
   /etc/letsencrypt/live/www.wordpressleaf.com/fullchain.pem
   Your key file has been saved at:
   /etc/letsencrypt/live/www.wordpressleaf.com/privkey.pem
   Your cert will expire on 2018-08-02. To obtain a new or tweaked
   version of this certificate in the future, simply run certbot-auto
   again. To non-interactively renew *all* of your certificates, run
   "certbot-auto renew"
 - If you like Certbot, please consider supporting our work by:

   Donating to ISRG / Let's Encrypt:   https://letsencrypt.org/donate
   Donating to EFF:                    https://eff.org/donate-le
命令说明
–email 你申请证书的邮箱,用来接受一些信息,例如到期信息。
–webroot 使用根目录验证的方式申请证书。
-w 指定申请的网站根目录,例如 /www/html/wordpressleaf。
-d 指定申请的域名
申请完之后,你的证书保存在证书和KEY保存在/etc/letsencrypt/live/www.wordpressleaf.com/目录。
/etc/letsencrypt/live/www.wordpressleaf.com/fullchain.pem
/etc/letsencrypt/live/www.wordpressleaf.com/privkey.pem
上面的执行日志已经告诉你了,叶子单独列出,表示强调。
使用SSL证书
首先,你要打开443端口,然后在APACHE的虚拟主机文件中加入以下代码。
<VirtualHost *:443>
 DocumentRoot "/opt/lampp/htdocs/test"
 ServerName www.wordpressleaf.com
 ServerAlias www.wordpressleaf.com
 SSLEngine on
 SSLCertificateFile "/etc/letsencrypt/live/www.wordpressleaf.com/fullchain.pem"
 SSLCertificateKeyFile "/etc/letsencrypt/live/www.wordpressleaf.com/privkey.pem"
 <Directory "/opt/lampp/htdocs/test/">
 Options FollowSymLinks
 AllowOverride All
 Require all granted
 </Directory>
</VirtualHost>
如果我们需要把http的方式全部转换为https,那么我们需要做http跳转到https的设置,具体可以查看xampp中开启https配置ssl证书。
更改WordPress数据库的数据
我们的网站如果使用WordPress,那么需要把数据库中存储的http网址全部替换为https。
UPDATE wp_options SET option_value = replace(option_value, 'http://www.wordpressleaf.com','https://www.wordpressleaf.com') ;
UPDATE wp_posts SET post_content = replace(post_content, 'http://www.wordpressleaf.com','https://www.wordpressleaf.com') ;
UPDATE wp_comments SET comment_content = replace(comment_content, 'http://www.wordpressleaf.com', 'https://www.wordpressleaf.com') ;
UPDATE wp_comments SET comment_author_url = replace(comment_author_url, 'http://www.wordpressleaf.com', 'https://www.wordpressleaf.com') ;
UPDATE wp_postmeta SET meta_value = replace(meta_value, 'http://www.wordpressleaf.com', 'https://www.wordpressleaf.com') ;
这样的操作之后,我们的WordPress网站才能正常运行。
自动续约证书
模拟续约
我们的SSL证书是90天到期,到期后我们需要再次续约,我们可以先模拟测试一下。
./certbot-auto renew --dry-run

Saving debug log to /var/log/letsencrypt/letsencrypt.log

-------------------------------------------------------------------------------
Processing /etc/letsencrypt/renewal/www.wordpressleaf.com.conf
-------------------------------------------------------------------------------
Cert not due for renewal, but simulating renewal for dry run
Plugins selected: Authenticator webroot, Installer None
Renewing an existing certificate
Performing the following challenges:
http-01 challenge for www.wordpressleaf.com
Waiting for verification...
Cleaning up challenges

-------------------------------------------------------------------------------
new certificate deployed without reload, fullchain is
/etc/letsencrypt/live/www.wordpressleaf.com/fullchain.pem
-------------------------------------------------------------------------------

-------------------------------------------------------------------------------
** DRY RUN: simulating 'certbot renew' close to cert expiry
**          (The test certificates below have not been saved.)

Congratulations, all renewals succeeded. The following certs have been renewed:
  /etc/letsencrypt/live/www.wordpressleaf.com/fullchain.pem (success)
** DRY RUN: simulating 'certbot renew' close to cert expiry
**          (The test certificates above have not been saved.)
-------------------------------------------------------------------------------

IMPORTANT NOTES:
 - Your account credentials have been saved in your Certbot
   configuration directory at /etc/letsencrypt. You should make a
   secure backup of this folder now. This configuration directory will
   also contain certificates and private keys obtained by Certbot so
   making regular backups of this folder is ideal.
正式续约
等到了要到期的前3天左右,就可以申请续约了,使用以下的命令。
./certbot-auto renew --quiet --no-self-upgrade

Saving debug log to /var/log/letsencrypt/letsencrypt.log

-------------------------------------------------------------------------------
Processing /etc/letsencrypt/renewal/www.wordpressleaf.com.conf
-------------------------------------------------------------------------------
Cert not yet due for renewal

-------------------------------------------------------------------------------

The following certs are not due for renewal yet:
  /etc/letsencrypt/live/www.wordpressleaf.com/fullchain.pem expires on 2018-08-02 (skipped)
No renewals were attempted.
–quiet 使用安静模式,不弹出提示。
–no-self-upgrade certbot-auto不升级自己。
叶子现在执行的话,就提示证书还没有到期,不能续约。
强制续约
在这篇博客里面提供了一种强制续约的方法,叶子没有试用,大家感兴趣可以试一下。传送门。
./certbot-auto renew --force-renew --no-self-upgrade
结束
你学会了吗?